So you've just received your ATA Express, and you want to use it with your PSX? Here's what you need to do.
Pre-requisites
- A computer
- These steps are written using Linux. Windows should be possible.
- Your ATA Express
- (Optional, recommended) either, or both:
- A longer Flat Flex Cable (FFC) to connect the HDD riser to the motherboard. (50-pin, 0.5mm pin pitch, straight / not reversed/flipped. 10cm works. Shielding not mandatory)
- An IDE "extension" cable. (40-pin .1" (2.54mm) pin pitch IDC cable, male to female. 80-wire is ideal, but shorter (~10cm) 40-wire cables seem to work)
- A micro SD card:
- Any brand except Samsung
- Ideally UHS-1 or better
- SD Express not supported, but will work in non-express mode
- 64G, 128G, 256G and 512G have all been confirmed to work. 32G does not work.
- An SD Card reader
- You can use an SD Express card and reader, which will significantly speed up reading or writing the SD from your computer, but it won't help the speeds in the PSX.
- Your PSX (Mostly working)
- Must be able to boot from Memory Card
- Must be able to read your USB
- HDD cable and riser board is required
- A "homebrew" memory card (normal, sd2psx or PSXMemCard OK, with PSBBL or FMCB in PSX mode)
- A USB drive (Fat32)
- A PS2 controller
If you are restoring a backup, you'll also need:
- A way to program SPI flash
- This guide uses a Raspberry Pi Pico and https://github.com/opensensor/pico-serprog
- You'll need breadboard cables or similar.
Installation
Installation is three broad steps:
- ATA Express and SD Card preparation
- Skip this step if you have a brand new ATA Express, and don't have or don't want to restore a backup.
- Mandatory if you are restoring a backup or using a "nullkey" image.
- Physical Installation
- Installing the ATA Express in the PSX. Kinda mandatory.
- Digital Installation
- If your machine "just works" after installing the ATA Express with a restored backup, you can skip this part.
- If you don't care about the PSX's original firmware, you can also (probably?) skip this.
- If your SD card is blank and you want to restore the XMB, you'll need to follow the steps in this section.
- If your PSX doesn't boot or acts weird, you probably need to reinstall, so follow these steps.
Preparation
This section can be skipped if you aren't restoring a backup or using a "nullkey" image.
Warning
You cannot restore a decrypted backup (e.g. created from NBD) directly to the HDD. That must be done with the drive connected to the PSX.
- The PSX encrypts the drive based on the SCE HDD ID. This means that any backup made directly connecting the drive to a computer is encrypted, and the PSX must get the exact same ID when reading the restored backup.
- If you are restoring a PSX backup you made from a real PS2/PSX HDD, You will need to write the ID of __THAT__ HDD to the ATA Express. If you do not have the HDD ID, your backup can only be used on the original drive.
- If you aren't restoring a backup, you don't need to flash the ID.
- If you are using community "nullkey" images, your ID must be blank (all 0xFF). If it has been flashed before, it will need to be erased.
- The ATA Express ships with a blank ID by default, and is stored on a flash chip on the board. You only need to flash the board when you are changing the ID (including changing it from blank the first time). It does not change unless it is flashed using an external cable.
SD Card: Restoring a backup
- Connect your PC to the SD card.
- Dump your HDD image to your SD Card:
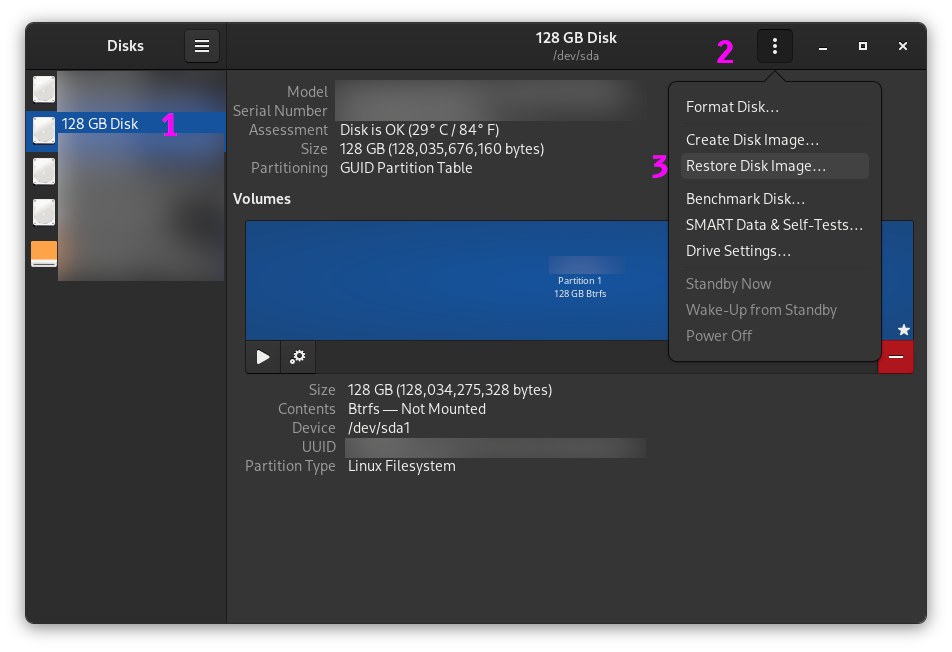
- If you have the GNOME "Disks" utility installed, you should be able to click on the SD card "drive", click the menu button and "Restore disk image". If not, follow the next steps in a terminal window.
- Identify your SD card's block device with lsblk - refer to the size column. You should see something like sda or possibly mmcblk0.
- If the SD card is not completely blank, it may have partiitons on it. You don't need to remove them, but you will need to unmount them: sudo umount /dev/<BLKDEV><PARTITION> e.g. sudo umount /dev/sda1 or sudo umount /dev/mmcblk0p1 (note that umount does not have an N at the start)
- cd into the folder containing your disk image: e.g. cd /home/<USERNAME>/Downloads
- Write the image: sudo dd if=<IMAGE NAME> bs=4K status=progress of=/dev/<BLKDEV> (TRIPLE CHECK YOUR SD's BLKDEV BECAUSE THIS WILL WIPE THE DRIVE / SD CARD)
- Once dd completes, run sync to ensure all data is written. Once the command completes, you can remove / eject your SD card.
- If you have the GNOME "Disks" utility installed, you should be able to click on the SD card "drive", click the menu button and "Restore disk image". If not, follow the next steps in a terminal window.
- Proceed to the "ATA Express: Flashing the HDD ID" section and flash the HDD ID from your backup.
SD Card: Using a nullkey image
Warning
The linked archives contain complete SD card images onto a 64, 128, 256, and 512G SD card. This means that these 1GB - 2GB 7z files contain 1920GB of uncompressed data.
It's recommended that you write the image you need directly to your SD card per the directions below, but failing that, just extract the image you need.
- Obtain the nullkey image collection for your model.
- DESR-5000, 5100, 7000, 7100 (PSX1): https://nroach44.id.au/upl/psx_upd-repart/psx1_v1.31_-40G_JP.nullkey.img.7z
- DESR-5500, 5700, 7500, 7700 (PSX2): https://nroach44.id.au/upl/psx_upd-repart/psx2_v2.11_-40G_JP.nullkey.img.7z
- Pick the image you wish to apply:
- The first part of the image name is specific to the PSX model it runs on, but the archives each only contain one variant, so it can be ignored. (psx1_v1.31 or psx2_v2.11)
- Then the size of the SD card it came from: 64, 128, 256 or 512G (_064, _128, _256, _512)
- We also specify the size of the PS2 area and the language for translations in the future (-40G_JP)
- If the image has been modified beyond just a simple re-install, it has a section at the end. In this case, _OPLWLE means I've added OPL (for NBD access) and wLE R3Z to the XMB as apps. (This means no swapping memory cards for homebrew)
- Finally, the file extension to indicate it's a "nullkey image" (.nullkey.img)
- So if you were restoring to a DESR-7500 (PSX2), with a 128G SD card (_128) and wanted OPL (_OPLWLE), you'd pick psx2_v2.11_128G-40G_JP_OPLWLE.nullkey.img.
- Don't extract it just yet.
- Connect your PC to the SD card.
- Dump your HDD image to your SD Card:
- Identify your SD card's block device with lsblk - refer to the size column. You should see something like sda or possibly mmcblk0.
- If the SD card is not completely blank, it may have partiitons on it. You don't need to remove them, but you will need to unmount them: sudo umount /dev/<BLKDEV><PARTITION> e.g. sudo umount /dev/sda1 or sudo umount /dev/mmcblk0p1 (note that umount does not have an N at the start)
- cd into the folder containing the nullkey archive: e.g. cd /home/<USERNAME>/Downloads
- Directly extract the image to the SD: 7z x -so <NULLKEY ARCHIVE> <YOUR PREFERRED IMAGE> | sudo dd status=progress of=/dev/<BLKDEV> (TRIPLE CHECK YOUR SD's BLKDEV BECAUSE THIS WILL WIPE THE DRIVE / SD CARD)
- sudo might hold this section up waiting for your password - if it looks like it's stalled, CTRL+C, run sudo true, then try again.
- If this fails, then extract the image from the archive and flash it per the method in the "SD Card: Restoring a backup" section above.
- Once the above command completes, run sync to ensure all data is written. Once the command completes, you can remove / eject your SD card.
- If your ATA Express' HDD ID is not blank:
- Create a HDD ID "backup" to match the nullkey images: dd if=/dev/zero ibs=1 count=256 | LC_ALL=C tr "\000" "\377" > nullkey.bin
- Proceed to the "ATA Express: Flashing the HDD ID" section but use nullkey.bin instead of psxhdd.bin.
ATA Express: Flashing the HDD ID
- Write your HDD ID to the ATA Express (if you need to):
- Flash your RPi Pico with https://github.com/opensensor/pico-serprog
- Download the pico_serprog.uf2 file from https://github.com/opensensor/pico-serprog/releases/
- Flash it to the Pico by holding down the BOOTSEL button while connecting it to your computer, and then drag the file onto the "thumbdrive" that appears. The Pico should disconnect.
- Connect the Pico to the ATA Express:
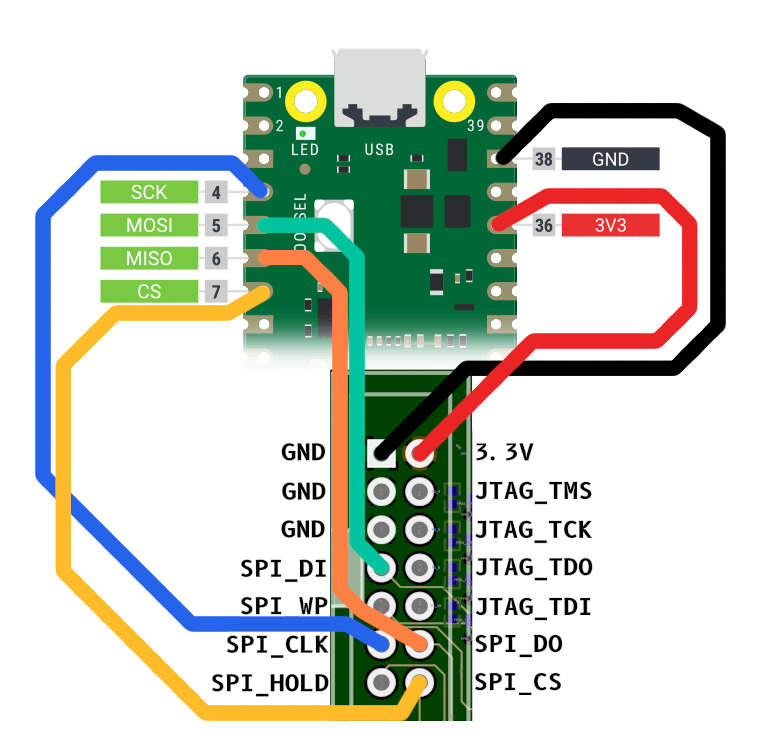
- Any Pico GND to any ATA-E GND
- Pico Pin 4 (SCK "GP2") to ATA-E SPI_CLK
- Pico Pin 5 (MOSI "GP3") to ATA-E SPI_DI
- Pico Pin 6 (MISO "GP4") to ATA-E SPI_DO
- Pico Pin 7 (CS "GP5") to ATA-E SPI_CS
- Pico Pin 36 (3V3) to ATA-E 3.3V
- Read out the flash: sudo flashrom -p serprog:dev=/dev/ttyACM0,spispeed=32M -c W25X40 -r flash.bin
- You may need to substitute /dev/ttyACM0 if your Pico shows up under a different serial port (e.g. using a clone, or you have a 4/5G modem in your laptop, or other serial adaptors).
- The file you read should be "empty" (filled with 0xFF). We don't actually need the contents, this just tests the programmer and gives us a template to modify.
- If you're running an installed Linux OS (as opposed to a Live USB) you can make yourself a member of the dialout group and avoid needing sudo on the commands in this step.
- Create a copy: sudo cp flash.bin flash_working.bin
- Write your ID into the file: sudo dd if=psxhdd.bin conv=notrunc of=flash_working.bin
- Substitute psxhdd.bin with the file containing your backed-up SCE / 8E HDD ID.
- Write the file to ATA Express: sudo flashrom -p serprog:dev=/dev/ttyACM0,spispeed=32M -c W25X40 -w flash_working.bin
- Flash your RPi Pico with https://github.com/opensensor/pico-serprog
Addendum: Updating the ATA Express FPGA
The last flashable item is the FPGA bitstream. It's the "program" that tells the FPGA how to act, and in the future you may need to flash a new one to fix a bug, or one that limits the size of the IDE disk to 160/250G (like the original drives). At the moment, there's no new bitstreams.
- Flash an updated bitstream to the ATA Express (Rough steps, WIP):
- Obtain the updated bitstream.
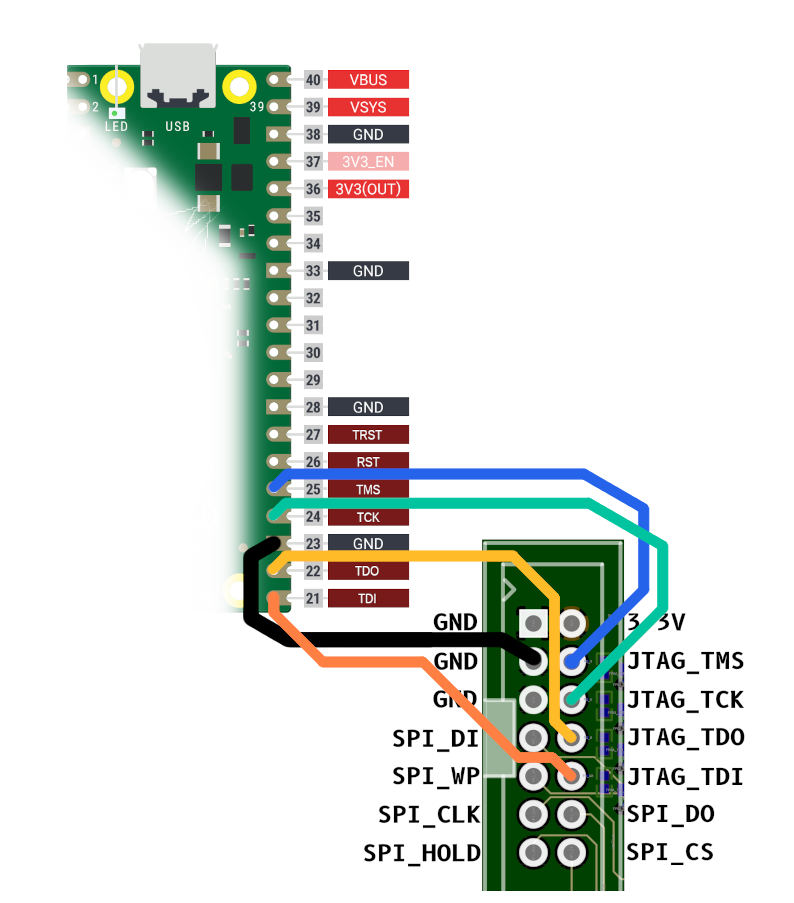
- Flash a pico with https://github.com/phdussud/pico-dirtyJtag
- Install openFPGALoader
- Hint: You may need to patch src/spiFlash.cpp per https://github.com/trabucayre/openFPGALoader/issues/633#issuecomment-3985664473 and then re-build it.
- Connect it to the ATA Express' JTAG pins.
- Power the ATA Express via the 5V / Molex power connector.
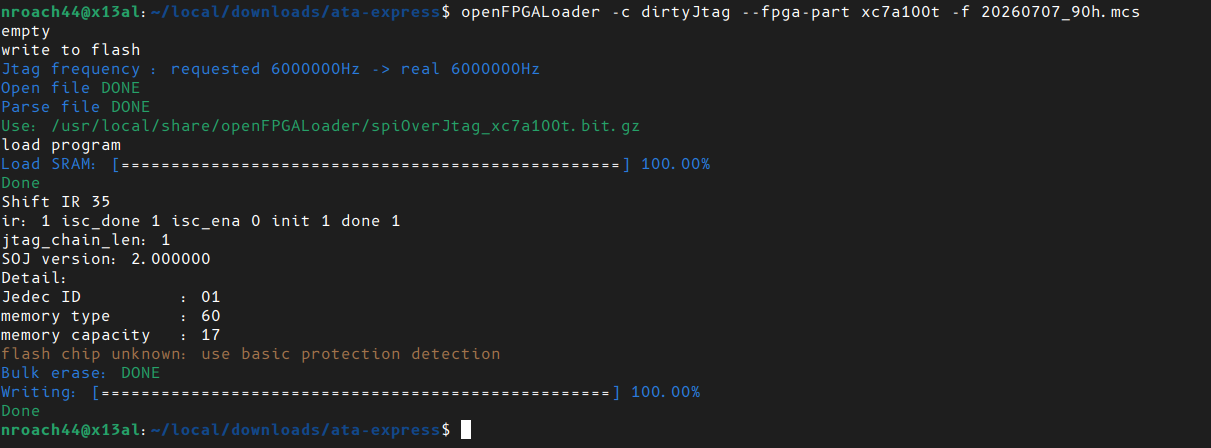
- Flash the ATA Express with: openFPGALoader -c dirtyJtag --fpga-part xc7a100t -f < BITSTREAM FILE >.mcs
Physical Installation
Warning
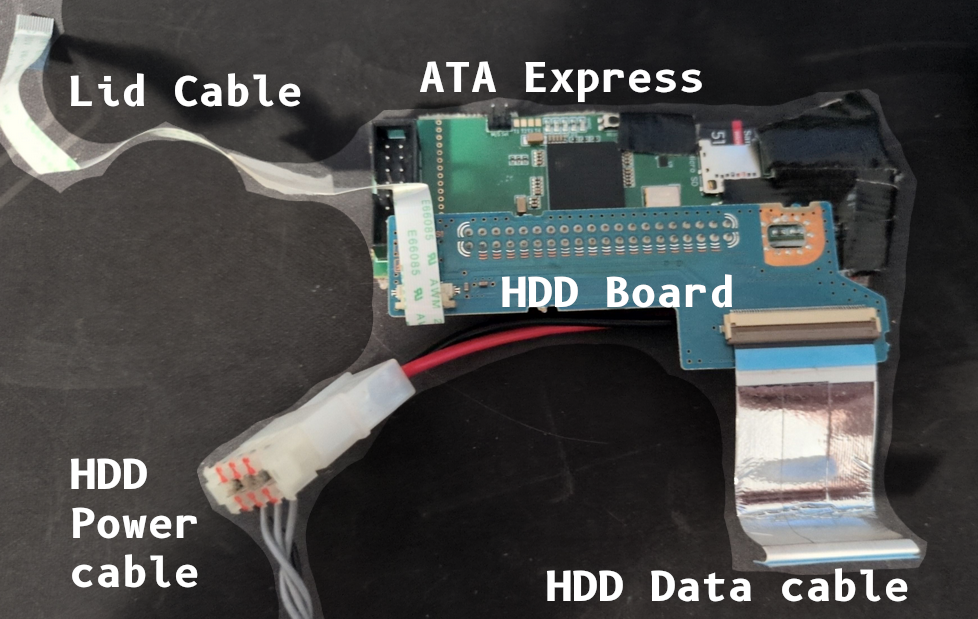
The PSX's ribbon cables old and are known to fall apart. Be very gentle. The plastic blue stiffeners fall off often, and are required for the cable to fit. If they do fall off, put them aside until you re-attach the cable, and insert the cable while holding the stiffener in the same point.
The PSX's lid board cable (which connects the LEDs on the top panel to the HDD board) is less fragile but more exposed, and mandatory. Take care when testing while the lid is off that the cable doesn't get pinched or pulled.
The PSDevWiki's PSX page has some information around FFC repair and replacement
The PSX's PSU is exposed while it is open, and can hold a lethal charge. Ensure power has been disconnected for at least 10 minutes before removing the top cover. Take extra care if you're operating the system with the top cover off.
- Disassemble the PSX
- Flip the PSX over.
- Remove the side rails by pulling the metal latch tab inwards to the PSX and pushing the rail backwards.
- Undo the 6 (PSX1) or 7 (PSX2) screws hidden under covers / plugs on the bottom of the device.
- Remove the IO label cover by removing it's two screws and popping the cover out. If lifts directly upwards but is often hooked at the rear, in the middle.
- Gently remove the cable connecting to the LED board behind the cover you just removed, by pulling it upwards, away from the board.
- Gently lift away the bottom. It may get caught on the front panel, so lift from the rear first. If it doesn't seem like it's going to come free, flip the unit over, remove the top, and then flip it back.
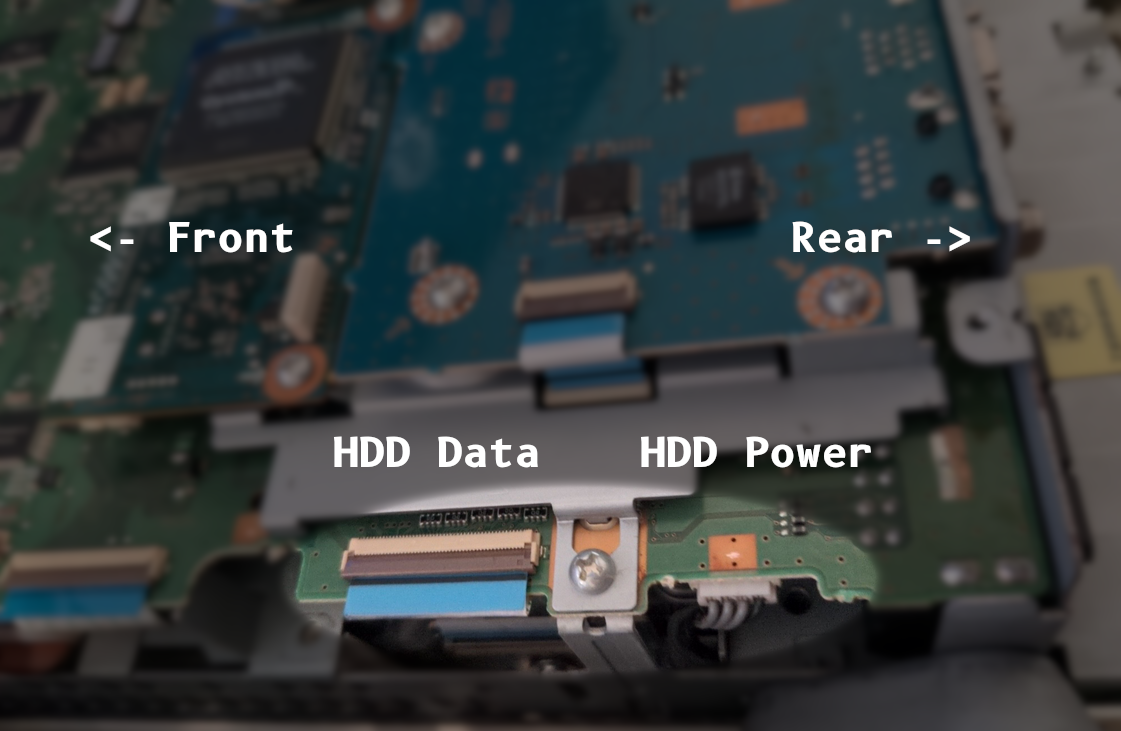
- Disconnect the HDD data cable by lifting the tab and gently pulling it out.
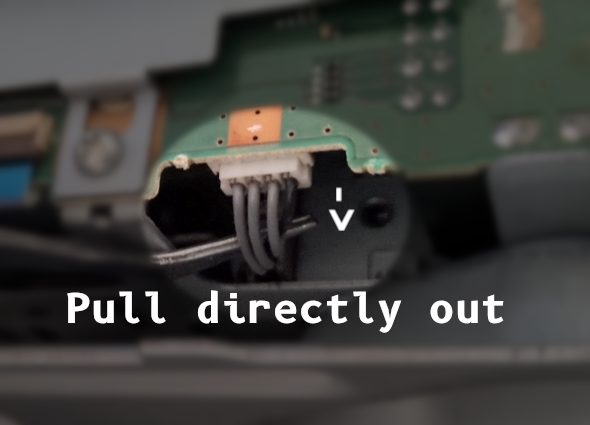
- Disconnect the HDD power cable by fishing it out from the other side of the board and pull it horizontally away from the board.
- Make sure the HDD data cable connector clip is pushed back flat, as it may get snagged on something when the unit is flipped back upright.
- Flip the unit over.
- Remove the top cover. Again, you may need to lift it from the rear end first.
- Swap the drive out:
- Remove the four screws holding the drive cage in.
- GENTLY lift the cage, drive, drive board and cables out. The cables are tucked under the metal frame and can be a bit awkward to remove. On the PSX2, you may have to lift the drive at an angle because the bracket is tucked under the back of the system's chassis.
- Separate the Drive board from the HDD:
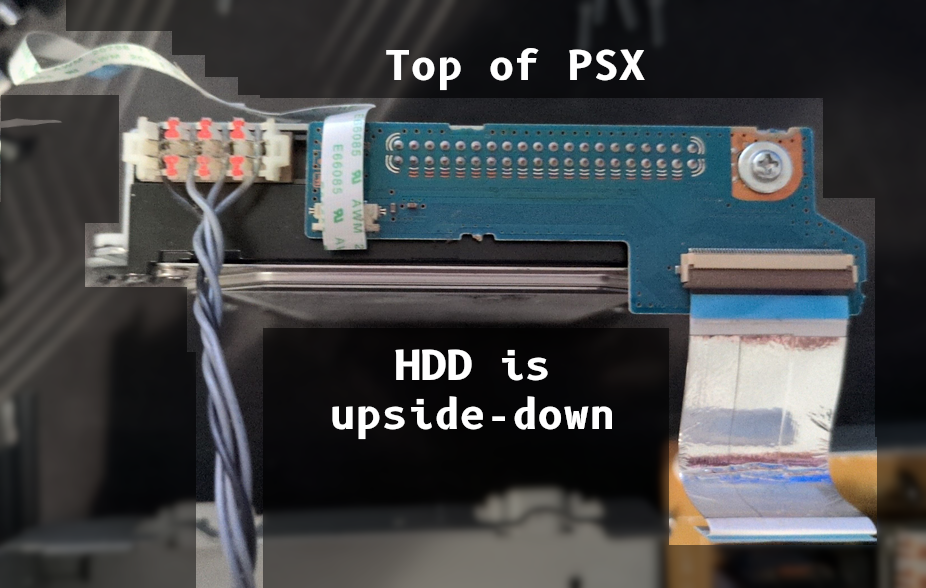
- PSX1: Remove all four screws from the drive, remove drive from the cage. Gently remove the drive board from the drive. Remove the power cable from the drive.
- PSX2: Remove the one screw holding the drive board to the drive. Gently remove the drive board from the drive. Remove the power cable from the drive.
- If you are not mounting the ATA Express to the HDD carrier, I would recommend covering the back of the HDD board, and the back of the ATA Express, with tape to ensure it doesn't short to the case.
- Insert your SD card.
- If you are using an adaptor or cable to allow the ATA Express to fit in the unit, you'll have to adjust these instructions to work with your kit.
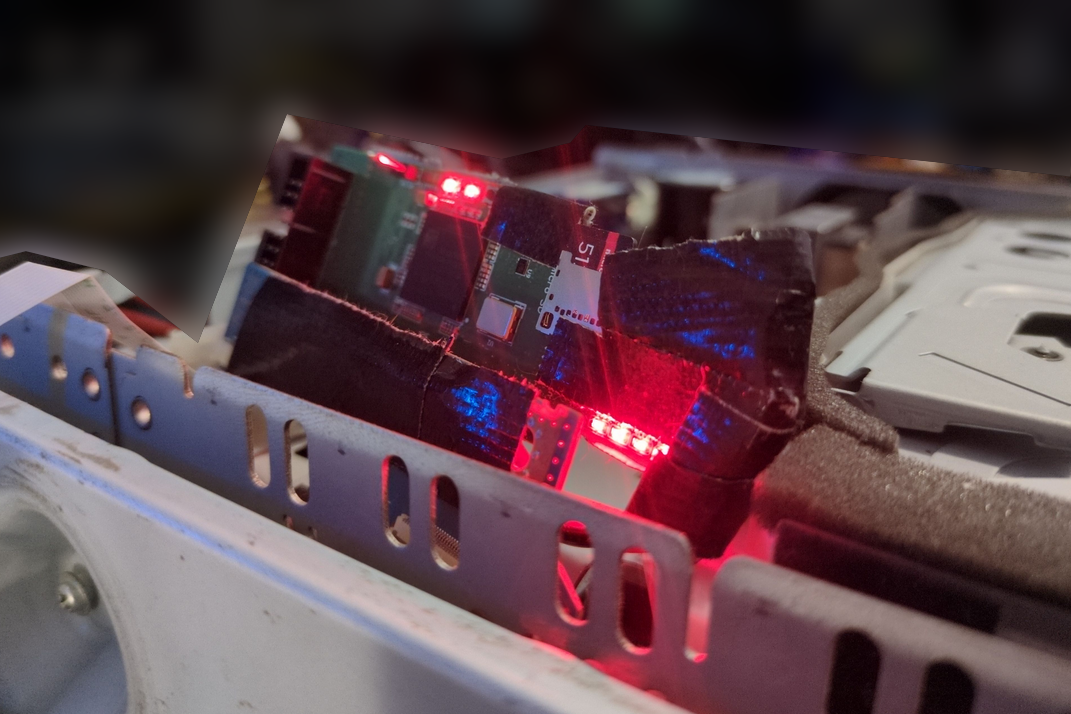
- Connect the ATA express. The ATA Express, without any extenders or adaptors, will sit above the top of the drive board. Push it onto the IDE connector, and connect the power cable.
- Re-connect the data cable and power cable. If you are having trouble getting it all to fit while still being gentle, try this method:
- Disconnect the HDD data cable from the HDD board
- Feed it down the side of the unit and connect it to the main board. Connect the power cable while you are here.
- Undo the four screws holding the optical drive's slot loader assembly (one in each corner of the slot loader, two in the front under foam, two in the rear (middle of the PSX) on the white cover).
- Move the slot loader forwards a small amount.Using tweezers or similar, feed the data cable into the HDD board and lock it down using the clip.
- Push the loader back into place, being gentle with the HDD assembly, and screw it back down.
- Re-assemble the unit. You probably won't be able to get the top cover on if you don't have an extender or adaptor, as the ATA Express sits too high, and the data cable is too short.
- You MUST have the lid board connected to the HDD board or the system will not start up.
Digital Installation
Ideally, a restored backup, onto an ATA Express with the correct HDD ID and matching size, should just work. As of writing, it doesn't, and we think that's because the disk is not the same size.
If you're not using a backup or you have restored a backup but the PSX is misbehaving, it's best to do a re-install.
Warning
This guide assumes your PSX's XFROM and DVRP firmware is the latest for your model (PSX1: 1.31, PSX2: 2.11). If your unit is too different, these images may not work predictably. Head into the PhenomMod Discord if you know or suspect your firmware won't match.
- Download the re-install tool & image for your unit:
- Extract it to the root of your USB drive
- Boot your FMCB / PSBBL Memory Card into a uLaunchELF variant
- Browse to mass:/ and launch HDDTOOL.ELF
- Come back an hour later or so and the system will have rebooted. You'll need to remove your Memory Card and turn off, then back on, the machine.
- It should boot into the XMB.
- You'll likely be missing the channels (including the DV channel on 7500/7700) in the TV section. To get them back, go through the setup wizard (the egg cracking icon) from the settings section.
Troubleshooting
Rule Zero of PSX homebrew: The machine is a bastard. This shows in many ways, and chances are if it's not working, it's one of these stupid issues:
- If your power light is flashing Green / Red after you've connected power, but before you've even turned it on, it could be an issue with the Lid board, see the next point.
- Have you checked ALL ribbon cables?
- No really, ALL of them. Yes, even the one that connects the lid. ESPECIALLY that one.
- Does the ATA Express "HDD" show in uLE's HDD manager?
- If yes, and there are partitions, then some part of the firmware is failing. This may be due to the size of the disk changing. Do a re-install. If that fails, you may need to update the firmware for the new install. Hop into the Discord.
- If yes, but there's no partitions, (or it's not formatted) then the data on the SD card doesn't match the the HDD ID (or one or both is missing or wrong). Double check the image you wrote and the HDD ID you flashed. You can read the HDD ID off the ATA Express the same way you'd read it from the real HDD.
- If the HDD does not register (not connected), check your cables and connections. Try powering the ATA Express with an external adaptor, or a 5V regulator connected directly to the PSU's output pins.
- Does the HDD light flash in a repeating, almost heart-beat like pattern when starting?
- You probably need a re-install (again, probably because the DVR partition has changed). If that doesn't work, you may have a firmware mismatch after the re-install. Jump into the Discord.
- Is the HDD light stuck on? The ATA Express may have hung.
- Double check your ribbon cables. Mainly the HDD one.
- Did you just reboot the PSX? This is a bit of a known issue: The PSX cuts power but the FPGA doesn't "reset" fully before power is restored. Hold down the power button for ~10 seconds until the unit turns off. Give it ~5 seconds, then hit the power button again and it should work. Next time give the machine a few seconds before powering it up again.
- Is the SD card OK? If you've used a cheaper, or older, or used SD card, it may have worn out. Swap out the SD card and see if the new one shows up in uLE.
- If you're sure it's not your SD card or cabling, hop in the PhenomMod Discord and ask in the ata-express-psx channel / room.
- A Pink (red?) error screen on boot up (PSOD) is more complicated, but usually indicates one of the more complex boards may not be connected (usually the DVD-R controller board). GOTO CHECK_RIBBON_CABLES.
Acknowledgements
- Mena for creating the ATA Express with PSX compatibility, even if it was out of spite.
- DiscoStarslayer, uyjulian, niinoo for their work reverse engineering the PSX and answering many of my (mostly academic) questions.
- R3Z3N for keeping the PSX in mind with https://ps2homebrewstore.com/ and in their releases of tools, trying to get XFROM and dvr_hdd:/ support working in wLaunchELF, and helping out with homebrew.
- thehardrginger (Jon) for work on translations.
- Ḹazy Adran, GhostTownUS- for helping others out in the chat.
- TewSlo for working on a faster disk image solution.
- vitas155 for the older documentation and translations.
- Countless others - if you were missed, it's because Discord sucks to scroll back through.
- All the usual PS2 Homebrew developers, like SP193, Pixel, AKuHAK, krHACKen, Berion.